Introduction
The Viscous Coupling (VC) is the drive train
component
that transmits power
from the center drive shaft to the front differential, and on to the
front
wheels. Inside the coupling there is a silicon liguid/goo that
turns
nearly into a solid when exposed to shear force caused when the VC
input
and output shafts rotate at different speeds. The input shaft is
connected to the rear wheels. The output shaft is connected to
the
front wheels. When the front and rear wheels turn at different
RPMs
(at a rate greater than 6%), the shear force raises the temperature and
viscosity of the silicon liquid inside the VC. The silicon
becomes
solid like and engages plates inside the VC with the result that power
is transmitted from the center drive shaft (the engine) to the front
differential
(the front wheels).
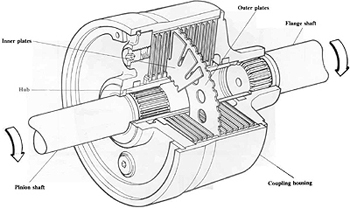
Diagram
of the Syncro Viscous Coupling
When the front and rear wheels begin to rotate
at
relatively the same RPMs
again, the liquid "deactivates," becomes less viscous and more liquid
like,
and as a result the front wheels/diff. disengage, and the van is
powered
again only or primarily by rear wheel drive.
 VC Fail - Causes & Effects
A VC can fail in two basic ways: it can stop
engaging
altogether or it
can remain constantly engaged (sometimes only at higher operating
temps).
VC fluid loss caused by leaking seals seems to be the most likely cause
of a total failure of the VC to engage at all. When this happens,
you never have 4 WD. The more insidious and costly failure
occurs when the VC remains engaged when it should not be engaged.
This can lead to destruction of the entire drive train, including the
expensive
transaxle.
There appear to be two primary causes for the
VC to
engage when it should
not: (1) having tires that are not all the same size and wear (all 4
must
be the same), and (2) age...VCs appear to have a nautural life span, at
least where subjected to routine high operating temps. (One shop
also claims that having a drive train that is not properly aligned also
causes premature engagement, but this theory seems questionable.)
When tires of different wear or size are used,
it
causes the VC to engage
prematurely or even constantly. It makes the VC "think" your
wheels
are slipping and that you need 4 WD. Premature or constant
engagement
of the VC, particularly at highway speeds, overheats the VC, thereby
"cooking"
the viscous fluid. Over time, this causes the properties of the
fluid
to change so that it engages the VC prematurely or even
permanently,
thereby stressing the other components of the drivetrain.
A typical scenario leading to a cooked VC would
involve a syncro with tire
sizes that vary slightly in treaddepth. The syncro is regularly
driven at highway speeds for hours at a time over a period of
time.
Eventually, the driver notices binding in the drive train
whenever
she pulls off the highway into a gas station for gas. It may be
subtle
at first. Eventually, though, as the fluid gets cooked and
ruined,
the wheels seem to stiffen or bind much easier than before, and
ultimately at
the slightest turn of the wheel. When it gets bad, the drive
train may lock up completely in the parking lot at very slow speed upon
a relatively slight turn of the steering wheel. This total
engagement
of the drive train puts tremendous strain on the components of the
drive
train when the van is moving at speed under power. With continued
use, the transaxle soon fails, the drive shaft and CV joints are also
strained.
There is some dispute as to whether a properly
functioning VC will cause
binding in very tight turns, like when turning while backing out of a
driveway,
or doing a sharp turn in a parking lot. The VC engages when the
front
and rear wheels turn at different speeds, greater than 6% in relative
RPMs.
When the front and rear wheels turn at a greater difference in RPMs
during
sharp turns (above 6%), it would seem that the VC would engage and
cause
some binding. However, a brand new VC will not do this, even when
warm.
Chirping/binding
in tight turns at least provides good
cause to check your
tire tread depth and to keep an eye on whether the symptoms become
progressively
more pronounced. However, symptoms indicating that the VC is
engaging
sooner than it used to or should be, such as obvious binding at low
(parking
lot) speeds, easily induced binding (i.e., upon less turn of the
steering
wheel) and heat related binding (after long high speed summer trips),
should
not be ignored and should be investigated immediately in order to avoid
huge repair bills. Brand new OEM VCs can be had for about
$1100. From the dealer, they cost over $2,000. If you
cannot
afford or find one right away, remove your center drive shaft until you
do to avoid causing damage to the drive train. Have a qualified
mechanic
do this, or follow the procedures in Bentley. There are a few not
apparent procedures that should be followed.
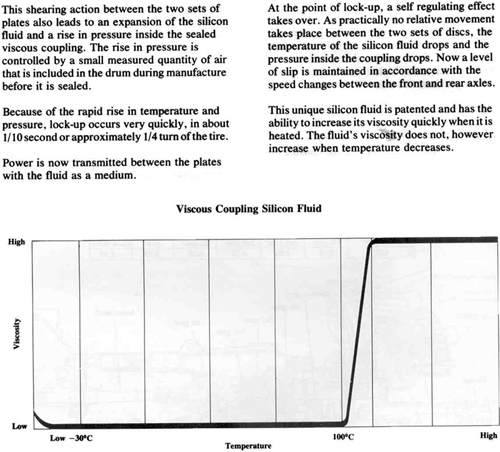
The Effect of Heat on the VC
As the chart
below depicts, at 110 degrees
centigrade, the VC silicon fluid viscosity increases dramatically, thus
engaging the VC. Since temperature is a cause and not just an
effect
of VC engagement, it seems probable that the "engagement
temperature"
of a "cooked" VC (a VC where the fluid has been ruined by prolonged
overheating)
is lower than for a non-cooked VC, and that with cooked VC fluid, the
VC
engages at the higher end of normal VC operating temperatures, with the
result being that the VC is always engaged at the higher normal
operating
temperatures even if the wheels are turning within the 6% threshold for
engagement. This puts incredible strain on the entire drive train.
Test for Proper Function of the VC by
"Dr. Rainer Woitok"
VW's
original (German) repair manual doesn't say much about how to test the
viscous coupling. They only recommend placing the rear wheels in
a break testing stand. If you then switch to the G-gear
(creeping
gear), the front wheels should move the van out of
the
test stand as soon as the engine is revving slightly above
idle.
If the front wheels fail to do so the viscous coupling is to be
replaced,
VW says. VW adds another tiny sentence to this, saying that
only when the engine is revving at idle and with the
G-gear
switched in, the viscous coupling is able to absorb all the
torque
to the front wheels and keep them from moving.
To me this
last and rather ill formulated (in the German manual)
sentence is the key to testing the viscous coupling. For in most
cases we are not dealing with viscous couplings doing less than
their
share, but rather with hard going viscous couplings which don't
have
a problem at all in moving the van out of the
test
stand with the engine just idling. [i.e., prematurely engaging
VCs
-ed.]
Thus the really important
thing here is not the van successfully leaving the test stand. On
the contrary, the important thing here is the van not
moving
and staying put in the test stand with the G-gear switched in and the
engine
just idling. If your Syncro doesn't pass this test your
viscous
coupling is probably worn out and ready for a
replacement.
Or put the other way round: as long as your
van's
viscous coupling is working properly you will not notice your van
has got one. [Except, perhaps, when making tight turns in a
parking
lot. Some binding and chirping is ok when you make very tight
turns.
It is the temperature-relarted, stiffer and more easily triggered
binding
that is symptomatic of a problem needing immediate attention. -ed.]
How
to Replicate the VW Test
Using
a
heavy floor jack with wheels, put a block of wood on the jack and raise
the rear of the van using the skid plate. Be careful, you can
bend
it. The wood block, if long enough, distributes the weight across
enough of the skid plate to minimize that risk. Lift both
back
wheels off the ground 6" or so on a smooth level parking lot, with the
jack's wheels parallel to the Syncro's. The rear of the van will
be moving on the jack wheels, so you need to make sure there are no
obstructions
that could catch the jack wheels and cause the van to fall off the jack.
Now, put
a 1x1 piece
of wood in front of each front tire, 2x4 may work too. You need
to
block the front wheels like this to be able to test whether the VC is
capable
of absorbing the spinning of the rear wheels without locking up and
causing
the front wheels to engage and climb over the wood. If you can
get
the rear wheels to turn/spin in the air with the clutch fully
disengaged,
and without the van climbing over the wood blocking the front wheels
(can't
be too high...1-2"), then the VC is definitely good, or the fluid is
not
cooked. The van should climb over the blocks as soon as you
increase
the engine RPMs.
It may
take several
tries to get the van to do this. The VC is very sensitive, and it
will want to engage as you let the clutch out. Some advise using
the hand brake to help slow the spin of the rear wheels ... or to start
them spinning slowly at first. It is really neat when you get it
to work. Suddenly, the VC is working before your eyes in a very
graphic
way!
________________________________________________________________
Warning! You
could conceivably get killed or kill someone performing this
test.
If you die doing this, don't get mad at me!
_________________________________________________________________
A test to
see if
the VC is engaging is to take your syncro out into some fresh snow or
mud
and induce wheel spin. If you get none up front, but the rears
are
spinning, you have a problem...which could be blown VC seals or perhaps
a bad front differential. This test, however, does not help you
diagnose
a VC that is in the process of self-destructing, or is putting undue
strain
on the rest of the drive train, because it is engaging when it should
not.
Replacing the Viscous Coupling
 Tools and
torques
needed:
Tools and
torques
needed:
Front
diff
mounting
brackets: 17mm socket and ratchet, perhaps with
extension.
Use 17mm wrench to counter at the other side, 45 Nm (33 ft lb.)
VC
housing: 13mm
socket with extension, 20 Nm(15 ft lb.)
CV-joints: either
6mm hexagonal or 8mm multipoint socket with
extension
and ratchet, 35 Nm (26 ft lb.)
Drive
shaft: Two
open 13mm wrenches (sometimes only 12mm for the nuts), 35 Nm
(26
ft lb.)
Removal
Procedures:
|
1.
Hose off and wash under van around VC casing.
2. Raise front of van using jackstands.
3.
a. Record and mark the alignment of the
driveshaft to the front differential so that you can put the same bolt
through the same holes of each unit upon reassembly. This will reduce
the chances of your ending up with an out of balance driveshaft on
reassembly.
3.b.
Unbolt the four forward bolts holding
the driveshaft on with either a 1/2 inch or 13mm open end wrench and
some liquid wrench. If the 13mm wrench doesn't work that great, try the
1/2 inch open end wrench.
4.
Loosen the bolts holding the front
differential so that differential may be shifted around.
Loosen the two bolts at the top rear of the diff that support it from
on top, on an upside down "U" bar. Don't remove them yet. Take out the
three mounting bolts here, one in front (front is front), two at the
rear. Put a jack under the diff, and removed all bolts and
the mounts at this point.
5. Shift the front diff forward so that
the driveshaft will fall away from the front diff. Shift that
driveshaft out of the way.
6.
Remove the oil from the front diff
through the oil drain hole. Throw that oil away by bringing it to your
nearest auto repair shop for disposal. Shift the front diff
forward so that the driveshaft will fall away from the front diff.
Shift that driveshaft out of the way.
Before you remove the oil drain
plug, make sure you can remove the oil fill plug first.
7.
Remove the 13mm bolts holding the
back half of the front differential onto the vehicle and then pop the
rear third of the differential off backwards. Use your floor jack
to reposition the diff so that it slopes down as much as possible
toward the rear. That way you will have complete access to all the
bolts without shifting things around. The bolts are 13MM. Also
have the remove the 14MM banjo bolt and two small copper washers near
the top that connects the air vent hose for the diff.
Then
jack the back of the diff up so that it is more or less horizontal
again. Your jack must be on the main diff housing, not the VC housing.
Good luck on just "popping it off", mine was glued quite nicely, at
least the first time. This is why I suggst leaving the "U" bar on the
diff- use two pieces of nominal 2x2 about a foot long, levering
against the subframe and the two sides of the "U" bar to break the
seal. Once the rear housing is free, remove the "U" bar. Do
not loosen the big bolt at the rearmost point in the front differential
8. Have something on the ground to catch
the residual oil that will spill out.
9.
Pull the VC out and replace, being
careful to reinstall the little metal washer that is wedged in there.
No special tools or measurements of any kind are needed.
10.
Bolt everything back together, but bolt the front differential down
last after shifting it around to properly seat it in relation to the
rear transmission. Make sure everything front to back are arranged in a
perfect strait line front to back. This is very important, as there are
(unconfirmed) arguments that not doing so can lead to excess stress on
your VC. When bolting the driveshaft back on, either replace the 4
driveshaft nuts with factory new ones the way VW says to do it (proper
way), or just use Red Loctite the way about half the people on the list
do it (universal list method) or reuse the original nuts with no
loctitie the way the other half does it (pogo stick method; see below).
11.
Refill the front differential with
GL-5 Transmission oil using the factory specified viscocity. Mobil 1
makes a good GL-5 for the front diff. (Make sure not to use GL-5 in the
rear transmission, however, as that takes only GL-4--eveybody wisely
uses Redline GL-4 synthetic for the rear.) You can also use the Redline
GL-5 or GL-4 for your front differential.